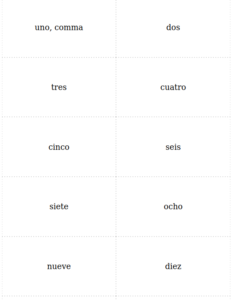
We coded a flashcard maker. These are instructions for it, although it’s pretty easy to use.
You paste text into the box and click ‘Format’ and then click ‘Print’ (you can ‘Print’ to your printer or to a pdf, and it should be already formatted properly). You flip your paper and put it back into the printer half way to print the other side of the flashcards.
You make lists of words like this:
word1,,palabra1;word2,,palabra2
Each pair of words is separated by a ; and the two words in a pair are separated by ,,
Because we use ,, to separate words, you can still use comma in your text (if you want to use a sentence for example on one side of your card which includes a comma). The only characters you can’t use on your flashcards are ,, and ;
If you go to the Arbol Flashcard Maker we have some ‘test text’ there. Just copy that text starting with ‘uno’ and paste it in the box and click ‘Format’ and you’ll see how it works. As you can see, the second set of words (for the other side of the flashcards) are in reverse horizontal order, so when you print them they will be correct.
When you print out your flashcards you can cut them into squares. Each regular sized sheet of paper (8.5×11, 22cm x 28cm), letter paper, makes 10 flash cards. We experimented with sizes and found that was the best for actual use. If you wanted to, you could double this by printing 2 sheets on each side of paper (you set this in your Print Settings when you actually go to print), but these will be quite small cards. We chose 28px font size. (You can change this using Inspect Element before you click print, see our video tutorial).

When you print, you have to take the pages out, rearrange the order, and flip them over and put them back in to print onto them again, because you have to print on the other side. If you have 4 pages to print total, you put 2 pieces of paper in and Print, then you arrange those sheets so the first one is top-most and print onto them again. (You might have to experiment to figure out how to put them in the second time, see our video tutorial for tips – the best tip is to draw a pencil up arrow at the top of the first sheet you print, which you can refer to when figuring out how to put the sheets in for the second part of the print.) Some people have printers that print both sides automatically, but most people don’t, so we formatted our cards for what most people have. If you have a double-side printer you probably know how to make this work, and so you can put your instructions in the comments below.
If you have any issues with printing, please check your Print Settings. Your Print Settings might be set to add a border or something, which will cause the cards to print weird. We have them set to if you just print with no modifications to it, it will print nicely. You have to print in Portrait mode, of course, not Landscape.
Note that there is a maximum thickness of paper which will run through a printer. Usually this is “cardstock,” which is 60-120 pound paper. Although a sheet of this may seem too flexible to you, when it’s cut into small squares it seems much firmer. When you go to buy this paper, you just say “cardstock” or just say you want the thickest paper that will go through a printer. They will know what paper this is, since it’s one of the most common requests.
Comment below if you have any suggestions for the Flashcard Maker, like if you’d prefer a different default font or something.